“I’m not a chef, I’m Italian”- David Rocco


Friday, June 28, 2013

Roasted Asparagus with Taleggio Goat Cheese "Mousse"


Ciao a tutti! Around a month back, I had the pleasure of taking a class at DeGustibus Cooking School by Melissa Muller Daka. Some of may remember my interview with Melissa some months back. She is the chef and proprietor of Eolo and she recently opened another restaurant, Pastai. The class was wonderful, we were served 5 courses, each paired with a different wine. She also demonstrated how each dish was made and shared some wonderful stories. The food was absolutely incredible; one dish that really stayed in my memory was a Spring Vegetable Salad Tower with roasted beets, taleggio, grilled asparagus and spring onions, drizzled with pistachio pesto.  I could not believe how something that sounded so simple tasted so amazing, I mean, this was really one of the best dishes I've ever tasted. 

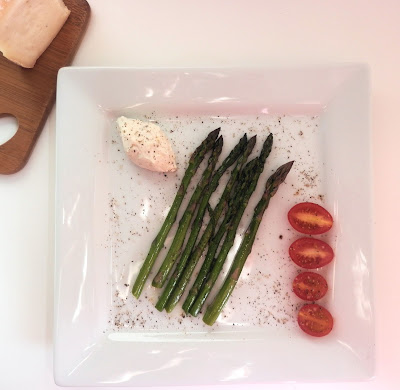
So, the other day at the green market, the asparagus looked so beautiful, I was tempted to try to recreate it. The only thing I did differently was omit the beets, because I served this with my beet gnocchi, so I think it would have been beet overkill. To replace the beets, I just added some beautiful fresh baby tomatoes. The asparagus have such a wonderful crisp and the cheese is just delicious. It's a combination of taleggio, goat cheese, spring onions and some seasoning. Since taleggio is a little strong for some, the goat cheese works perfectly and balances very well. Enjoy!! 


Spring Salad

The Asparagus and Tomato


3 tbsp. olive oil
1 pound of asparagus, cut and cleaned
1 tbsp. salt
1 tbsp. pepper

Baby tomatoes- as many as you would like
Salt and pepper (quanto basta)

Prepare a pan over medium heat and add the olive oil. Add your asparagus and season with the salt and pepper. Cook for around 5-7 minutes, you want the asparagus to stay crispy. Turn off the heat. 

The Taleggio Goat Cheese "Mousse"

1/2 cup of goat cheese
1/2 cup of taleggio
2 tbsp. fresh spring onions
1 tbsp. olive oil
1 tbsp. salt
1 tbsp. pepper
1 tsp. crushed red pepper
1 tsp. mixed Italian seasonings

In a food processor, add the goat cheese, taleggio, spring onions, olive oil, salt, pepper, crushed red pepper and Italian seasonings. Process until very smooth and creamy. 

To serve the salad, place a spoonful of the cheese "mousse" on your plate and serve with some of the roasted asparagus and a few baby tomatoes, sliced. Sprinkle the entire plate with a little extra salt and pepper. Buon Appetito! 

Thursday, June 20, 2013

Beet Gnocchi with Beet Greens Pesto


I have confessed my love for pasta multiple times. I mean, I’m Italian, not liking pasta would practically be considered a sin, right? Well, maybe not, but to some people. The funny thing is, I hated pasta when I was little, I didn't want any part of it. But now, I’d say I have pasta anywhere from 3-4 times a week. 

Since I really started cooking and when I say really, I mean REALLY. When I use to cook, I would make eggs, simple pasta dishes and I loved to bake. Now I’m very into making everything from scratch and that includes my pasta. One of my favorite pastas is gnocchi, which is an Italian dumpling that is traditionally made with flour and potato, of course like any pasta, there are a million variations. I've even made Gluten Free Pumpkin Gnocchi, so pretty much nothing is off limits!! 

For weeks, I've been wanting to experience with different gnocchi’s and what intrigued me…was the beet. Beet Gnocchi that is!! I knew I wanted to serve it in a special sauce, something a little “out there”…beet greens pesto!!

When you get beets the top have all of these beautiful greens that most people don’t bother using, but when I got my beets, they were extremely fresh, so I turned the greens into pesto! These gnocchi have a wonderful earthy taste, the flavor is not of your typical gnocchi, however the texture is. There is nothing like homemade gnocchi, they are so light and tender. I call gnocchi little clouds, because to me, that’s what they taste like! Making homemade gnocchi does take some effort, but to me, it’s completely worth it. You’ll never want to buy packaged gnocchi again!

Beet Gnocchi


1 pound of potatoes
½ pound of beets
2 tbsp. olive oil
1 tsp. salt
1 tsp. pepper
¾ cup of double 00 flour (if you don’t have double 00 flour, you can substitute semolina or AP)

Heat your oven to 400 degrees. Cleaning your potatoes and beets. Cut the beet greens off of the top and set them all aside in a large bowl. Bake the potatoes and beets until they are tender, this could take anywhere from an hour or so, depending on the heat of your oven.

Once the beets and potatoes are done, take them out of the oven. Split the potato so steam escapes. Allow to beets to cool while preparing the potatoes. With the potatoes, peel off the skin and take out of the flesh. Set the potatoes aside.
When the beets have cooled, peel the skin and transfer the beets to a food processor. Add the olive oil, salt and pepper. Process until smooth.

With the potatoes, pass the potatoes through a ricer into a large bowl. Add the beet puree. Add the flour in shifts. Use your hands; do not use a spoon or a whisk of any kind!! As you go along, you will be able to tell if you may need more flour. Prepare a baking sheet with parchment paper. Roll a piece of the dough into a rope and then cut into little pieces. Continue rolling the dough into ropes and cutting until you have finished making all of your gnocchi. I kind of like it when my gnocchi are slightly different sizes and shapes, there is something rustic about it me. Put the gnocchi on the parchment paper. I put my gnocchi in the refrigerators for around an hour to set and make sure they hold their shape.

In the meantime, make your beet greens peso…

Beet Greens Pesto

½ cup to 1 cup of olive oil (depends how thick or thin you want it)
1 tbsp. salt
1 tbsp. pepper
1 tsp. crushed red pepper
1 tbsp. fresh squeezed lemon juice
½ cup of toasted pistachios
The beet greens from your ½ pound of beets, cleaned, blanched and chopped
¼ cup basil, cleaned, blanched and chopped
¼ cup parsley, cleaned, blanched and chopped
½ cup grated parmigiana

Add your olive oil, salt, pepper, red pepper, lemon juice and pistachios to a food processor. Pulse a few times. Add your beet greens, basil, parsley and parmigiana. Taste, you can adjust the salt and pepper if you like. Mix until smooth and creamy. Store in an airtight container in your refrigerator. I would suggest using this within a week.


Back to the gnocchi!! Prepare a large with water over high heat. Set a pan on the stove where you will transfer your gnocchi when they are done. When the water is boiling, add the gnocchi. Fresh gnocchi cooks VERY quickly. Once it floats to top, using a slotted spoon, put the gnocchi in your other pan. Add ½ cup of the beet greens pesto to the gnocchi and gently toss. Enjoy!! 

Monday, June 17, 2013

Dean and Deluca

I've lived in NYC my whole life and something I never have to worry about is a shortage of fantastic food and wonderful gourmet stores. Which brings me to Dean and Deluca, not only can you shop in person, but you can also shop online. Just a quick browse and you’ll be in food lovers’ paradise. For those who weren't brought up foodies or are still discovering their tastes, a big store filled with so many different types of delicious cheese, pasta, assorted oils, meat and so much more can seem a bit overwhelming, but luckily all of the items are listed with a detailed description and costumer written reviews.

Having Dean and Deluca is like having a gourmet chef at the drop of a hat. Let’s imagine that you’re throwing a last minute dinner party and just don’t feel like all the fuss, well, Dean and Deluca can take care of that! You’ll be able to buy beautiful already prepared appetizers, crackers, cheese, seafood and dessert. The dessert selection is enough to have me begging for more! Café crème torte, macaroons, even a selection of ice cream and gourmet popcorn!! I mean, you guys know me, I’m very big on preparing everything myself, but I’ll admit that sometimes a night will strike when I just want to be lazy and do something easy, Dean and Deluca makes that very easy for me.

There is really something for everyone here; the store is broken down into sections to make shopping a breeze: Butcher, Seafood and Shellfish, Hors D’oeuvres and Appetizers, Bread and Bakery, Cheese, Pasta, Rice and Grain, Salt and Seasoning, Coffee, Tea and Beverage, Desserts and Snacks, Jams, Syrups and Honeys, Oil, Vinegar and Condiments and last but not least, Kitchen and Dining. I challenge you not find something you’ll LOVE!  I’m tellin ya, make Dean and Deluca your next stop for all things gourmet, you won’t be disappointed. You’ll be salivating!! 

Tuesday, June 11, 2013

Filet of Sole and Shrimp Francese


Ciao il mio amici!! I love seafood. I have to admit though; I never actually cook with fish until very recently. As I've mentioned, I use to be a vegetarian and on top of that…this is going to sound childish, I hate touching raw protein. Fish, chicken, pork, you name it. I guess I had a certain idea of it that took some time to get over. Now…forget about it!! I love cooking protein, in fact, I love it so much, that not only do touching, butchering or cleaning raw protein not bother me, I actually LIKE it!! I know, it’s weird. Well, enough about my odd habits. The other night I wanted to try my hand at one of my favorite dishes..Filet of Sole and Shrimp Francese.

When I was little, my family would go to a local Italian restaurant and every time I got the same thing..Fillet of Sole Francese. Tender, flaky fish with a light coating of flour. Creamy lemon sauce. I mean, heaven right?!? So, this is my take on one of my favorite dishes. The sole and shrimp are made with just a light dusting of flour, I hate the idea of this dish made with so much of a coating that it just tastes like fried fish. You want the fish to practically melt in your mouth with all of the lemony, buttery goodness. Buon Appetite!!

Fillet of Sole and Shrimp Francese


6 tbsp. olive oil
6 tbsp. butter
5 or 6 pieces of sole (you can also use Tilapia)
1 pound of shrimp, cleaned, de-veined and butterflied
1 cup of flour
2 eggs
4 cloves of garlic
2 lemons, sliced
¼ cup fresh lemon juice
¼ cup white wine
½ vegetable stock
Handful of chopped fresh parsley
Salt and Pepper (quanto basta!)

Start by preheating your oven to 300 degrees. Prepare a large skillet over medium heat, add 3 tbsp. of the oil and 3 tbsp. of the butter. Heat until foaming.

Pour your flour in a shallow dish or deep enough bowl. Whisk two eggs in a medium size bowl. Dredge the fillets in the flour, make sure you coat both sides and then dip the fish in the eggs, and make sure it’s evenly covered. Repeat with all of the fillets and add to your skillet. Cook each side for 4-8 minutes; you want the bottom of the filet to get lightly browned before you flip them. Transfer the fillets to a baking sheet and place them in the oven to stay warm.

Repeat the same exact process with the shrimp. The shrimp however will cook very quickly, around 1-3 minutes each side. Transfer to the same baking sheet with the fish. Once you are done with all of the fish, add the remaining oil and butter and garlic to the skillet. Wait for the butter to foam and add the sliced lemons. Cook for 2 minutes. Add the lemon juice, wine and bring to a boil, cook until somewhat reduced. Add the vegetable stock; bring to a boil until the sauce is lightly thickened. Sprinkle in the parsley, salt and pepper. Reduce the heat to low and add the fish and shrimp to the skillet. Serve immediately. Buon Appetito!!


Saturday, June 8, 2013

Flourless Chocolate Hazelnut Cookies


Ciao!! I use to be a big believer in the more the chocolate, the better the intensity. I never thought recipes just made with cocoa could do the trick, I didn’t think they would give me that rich chocolate taste that I was craving. But clearly, I was wrong.

The other night I thought back to cookie I use to LOVE! It’s from a famous pastry shops that use to be on the Upper East Side, where much of my childhood was spent. Most weekends I would treat myself to a cookie; it’s just the way it was. I wanted to try to recreate that cookie, which I knew only use cocoa powder. I also wanted to add my own Italian spin, hence the hazelnuts and espresso.


Some of you may recall my Eggland’s Best “Your Best Recipe Contest” winning Baci Espresso Cookies; this recipe is similar, except that this is flourless and made only with egg whites. This cookie is incredible, it’s very rich, slightly chewy, but in a good way, almost like a meringue and surprisingly intense. The outside sets and cracks beautifully and the inside is a little gooey, the nuts add a great great. Try this cookie. You won’t be disappointed.

Flourless Chocolate Hazelnut Cookies

Makes 9 medium size cookies


1 cup of blanched and roasted hazelnuts
1 ½ cups of confectioners’ sugar
¼ cup dark cocoa powder plus 1 tbsp.
1/8 tsp. salt
1 tsp. espresso powder
2 egg whites
½ tsp. hazelnut extract
½ tsp. vanilla extract
Coarse sea salt

Preheat your oven to 350 degrees. Prepare a baking sheet with parchment paper and treat with cooking spray.

Mix in a large bowl your hazelnuts, confectioners’ sugar, cocoa powder, salt and espresso powder. Add your eggs whites, hazelnut and vanilla extract. Using an electric mix, mix until combined and wet for around 2 minutes. I like to use an ice cream scoop to scoop the batter out and make them all uniform. Top the cookies with a sprinkling of coarse sea salt. Bake for 15-17 minutes, you want the tops of the cookies to crack. Serve immediately and enjoy!! Buon Appetito!! 


Friday, June 7, 2013

Death by Nutella Cake 2.0


Ciao a tutti!! Some of you may recall my Valentine’s Day Post…Death by Nutella Cake. Layers of nutella brownie, nutella mousse, nutella glaze, melted chocolate and toasted hazelnuts. I knew I was a mad woman already, this cake just proved it more so. But the madness didn't stop there. Due to the popularity of this cake recipe, I knew I had something, I knew I had to do more…..and so I did.

Death by Nutella 2.0. That’s right, another version of the “famous” Death by Nutella Cake, but this time, I 2.0ed it, making it even more extravagant. I kept the nutella brownie, nutella glaze and nutella mousse, but I went it even further with this recipe by adding a hazelnut meringue layer, candied hazelnuts and making this recipe into individual cakes. Now, you can very easily make this recipe into one large cake, the same way the original Death by Nutella Cake was made, I just figured by making them into little masterpieces, the deeper I could indulge my madness.  So I give you, without further adieu, Death by Nutella Cake 2.0!!!!

ENJOYING MY CAKE!!!!

Death by Nutella Cake 2.0

Nutella Brownie

1 stick unsalted butter
½ cup cocoa powder
¾ cup sugar
½ cup nutella
3 ounces melted chocolate
2 eggs
½ cup flour
½ tsp. salt

Preheat your oven to 350 degrees. Butter a round cake pan (9 by 1 ½ inch pan) and set to the side.

Melt 1 stick of butter and ½ cup of cocoa powder in the microwave, very slowly. You will want the cocoa to completely blend with the butter until it is smooth. When it’s silky, add ¾ cup sugar, ½ cup of nutella and 3 ounces of melted chocolate. Whisk in 2 eggs, add ½ cup flour and ½ tsp. salt. Fold. Make sure there are no lumps!! Pour into your cake and bake for 30 minutes.

When it is done, take it out of the oven and allow to cool for at least two hours. In the meantime, prepare the nutella mousse….

Nutella Mousse

1 cup heavy cream
1 tsp. espresso powder
1 tsp. hazelnut extract
½ cup nutella

In a medium size steel bowl, add 1 cup heavy cream, 1 tsp. espresso power and 1 tsp. hazelnut extract. Whisk until the espresso powder is dissolved. Add ½ cup nutella and using an electric beater, whisk until soft peaks form, this should take around 2-3 minutes. Do not overbeat though. Cover the bowl and refrigerate for two hours. Prepare the nutella glaze now..

Nutella Glaze


1 cup powdered sugar
¼ cup nutella
3 tbsp. milk

Add powdered sugar, nutella and milk to a medium size bowl. Whisk together until smooth. You can now prepare your hazelnut meringues…

Hazelnut Meringues


1 ¼ cup blanched hazelnuts
2 egg whites, at room temperature
1 cup of confectioners’ sugar
Pinch of salt

Preheat your oven to 350 degrees. In a food processor, pulse hazelnuts until finely ground, almost like a flour. In a medium size heatproof bowl, combine eggs, whites and pinch of salt. Set your bowl over, but not in, a pot with 2 inches simmering water and cook, whisk constantly until warm to the touch, it will take around 3 minutes. Remove the bowl for heat and using an electric mixer, beat on high until very thick and glossy. Fold in your hazelnuts.

Prepare a baking sheet lined with parchment paper. Grab a pastry bag, fit with a medium sized round pastry tip and fill with the meringue mix.  Using the pastry bag, form the meringues into small circles, around 3 by 3, this mix should make around 6 meringues of this size. Bake until cracked on top, around 19 minutes. Allow to cool. Now make your candied hazelnuts…

Candied Hazelnuts


¾ cup blanched hazelnuts
2/3 cup sugar
¼ water

Begin by lining a baking sheet with parchment paper. Preheat your oven 350 degrees. In a medium size saucepan over high heat, combine hazelnuts, sugar and water. Cook, stirring constantly to prevent sugar from burning. Continue to cook until the sugar is caramel colored, around 7 to ten minutes.

Quickly pour the nuts on the parchment paper and spread out with a rubber spatula. Place in the oven for 3 minutes and then remove. Let the candied hazelnuts sit and cool until the sugar has completely hardened. Once it has hardened, break the candied hazelnuts into pieces, whatever size you like!

Assembling the Cake


Step 1- First start off with the cooled nutella brownie. Using either plating rings or cake rings (I use 3 by 3, you can of course use 4 by 4 or whatever size you like). Using a serrated knife carefully cut the brownie forms into two layers. Set one layer aside, leaving the other bottom layer right where it is!

Step 2- Take the nutella mousse out of the refrigerator and spoon onto the bottom brownie layer. It shouldn’t flow over the whole cake. Using a spatula spread over the brownie, leaving an inch or so of the edges of the brownie bare (when you put the final brownie layer on top, it will naturally push some of the mousse further.)

Step 3- Place one of your hazelnut meringues on top of the nutella mousse layer. Spread with another layer of nutella mousse.

Step 4- Carefully put the top brownie layer over the mousse layer. Pour some of nutella glaze over the brownie and top with some of the candied hazelnuts. Drizzle with a little more of the nutella glaze. Serve and enjoy! Buon Appetite!!

Sunday, June 2, 2013

Italy, Beaches and Bikinis, Oh My!!

The pool at our hotel in Ischia

I spent the summer of 2011 in Italy studying opera. Most of my time was spent on the beautiful island of Ischia, just off the coast of Naples. While I was packing for my trip, I of course packed a lot of bathing suits. All of them were bikinis, except for one. I packed a black one piece with a matching skirt, in case, as I told my mother, I had a fat day. I had heard that Italians were different when it came to swimwear, but I had no idea just how different they really were.

The first day out in a suit was after a few days of binging in Rome. I felt a little more bloated than usual from all the bread and pasta, but I put on my favorite bikini anyway. A turquoise string bikini with wooden beads.  I was just going to the hotels outdoor pool and was hoping most people would be napping. The pool was packed. And everyone, young, old, thin and heavy, was in a bikini.

You would think living in an environment where you’re always in a bathing suit would make you much more body conscious, but if anything, it seems to have the exact opposite effect. Here in America, going to the beach is such an event for most women; we usually spend two weeks planning. We revamp our diet entirely and work out extra hard, knowing that soon our bodies will be on display. Not in Italy.

Women walk around with their heads held high, it’s no big deal to them. You see much older women in bikinis, which in America would be considered taboo. Girls who are maybe a bit fuller walk around in two pieces. 

Enjoying a nighttime stroll on the beach, not worrying about all the extra gelato I had!!

I am a healthy size, I'm 5’0 and around 100 pounds, but it just hurts to know that so many women are ashamed of their bodies. As a young woman, I have of course had my “fat” moments, but I have never felt bad about my body, because I am so grateful for everything that it can do.

Our bodies are not something to be ashamed of; they are to be celebrated. In Italy, almost all women wear bikinis. They’re confident and comfortable, to them it’s not even a second thought, it’s just a way of life. They don’t hide under a cover-up. They are proud of their bodies and not afraid to show it.  It’s such a different mentality, one that I wish all women, young and old, in the United States would adapt. Going to a beach in America is much more difficult. I hate it when I see other woman looking at each other and sizing each other up. Once I saw the way it was in Italy, putting on a bikini everyday was no big deal. In the past, I would check my stomach just to see if it was a little puffy, but I never did that once in Italy.....because it didn’t matter.

No one was going to judge me and think I should do more crunches or look at the woman in her 70s in the bikini and think she looked stupid or tell the size 18 girl to cover up. We should all feel this proud. So ladies, this summer when you’re going to the beach with all of your friends, get excited for a day of fun and sunshine (wear SPF!!) and put on that bikini


And by the way? That one piece didn’t come out of the suitcase the whole trip.