“I’m not a chef, I’m Italian”- David Rocco


Tuesday, March 20, 2012

Nonna's Fried Cauliflower


Buongiorno ! Today I will be serving a delicious savory cauliflower pancake. 

Il Contorno (side dishes)

As I mentioned in one of my previous posts, cauliflower is one of my favorite vegetables. When I taste cauliflower, no matter how it is prepared, the taste always bring back memories of my Nonna’s fried cauliflower.

Until recently, I was in charge of baking and my mom was the cook (an amazing one at that.) So, whenever I wanted fried cauliflower I would have to ask her to make it for me. I usually saved it for special occasions, like my birthday.

Preparing fried cauliflower is a decent amount of work, so I created this recipe that I can easily prepare for myself which gives me the taste of fried cauliflower. It is a fried cauliflower pancake. It is crisp and crunchy made with pieces of cauliflower. I make mine with ricotta cheese to keep it light.

Nothing will ever taste like my grandmas but this will do for now.


Cauliflower Pancakes

6 tablespoons of olive oil (divided)
½ head of cauliflower
2 eggs
¼ cup almond flour
½ ricotta cheese
Salt
Pepper
1 tsp. dried Italian seasoning

Chop you ½ head of cauliflower coarsely into small pieces. Heat a pan with 3 tablespoons of olive oil and put your cauliflower in the pan. Allow to cook slowly for around half an hour or until soft. Take off the heat and let cool.

In a large bowl, add 2 eggs and almond flour. Mix well. Add the ricotta cheese, salt, pepper and dried Italian seasoning. Add the cauliflower and stir together.

Use a deep pan since you will be frying. Prepare the pan with 3 tablespoons of olive oil and let it get hot. Take 2 tbsp’s of the mix and shape into round little pancakes and put in the oil. Allow each side to cook for around 4 minutes. I find that these cook quickly, so you do not want them to get overcooked. Take out of the pan and put it on a plate covered with a paper towel to drain the extra oil.

You can serve them as they are or with pesto or a balsamic reduction.

Enjoy these as a side dish to your main course or as wonderful little snack! Buon Appetito!

P.S. Let me know if you have a favorite food that evokes special childhood memories.  I would love to hear your stories! 

Sunday, March 18, 2012

Focaccia Pizza and Meatballs in Marsala sauce with mushrooms


Ciao lovely readers!! Everyone loves pizza; I have yet to meet anyone who will argue with the previous statement. It is the perfect food, combining all of the basic food groups. Dough, cheese and sauce. Really, who needs anything else? It is made even better when it is prepared with a delicious homemade focaccia crust and served with a side of meatballs in a Marsala sauce with mushrooms. So for your next “Pizza night”, put the down the take-out menu and trying whipping this up!

La Pizza

Focaccia Pizza:

Focaccia Bread (recipe below)
Tomato sauce (recipe below)
1 fresh mozzarella

Slice your mozzarella (as thick or thin as you like, depending how covered you want the pizza). Spread the tomatoes sauce on the focaccia bread (which should have been baked for around 5 minutes) and add the slices of mozzarella. Put the oven on 350 degrees and bake for 20 minutes. Take out and let sit and cool for 10 minutes. Eat and enjoy!!

Panis focacisu was flat bread baked in the ashes of the fireplace in ancient Rome. The word is derived from the Latin meaning “centre” and also “fireplace” – the fireplace being in the center of the home.

The basic recipe is widely associated with Ligurian cuisine. Because of so many small towns along the coast of Liguria, the focaccia recipe has been adapted into countless varieties (in Camogli they like it hard, in Voltri, they like it oily and soft). There are also many regional variations, such as focaccia dolce (sweet focaccia), popular in some parts of north-western Italy, which is a basic focaccia dough, sprinkled lightly with sugar, sometimes it’s made with raisins, honey, or other sweet ingredients. There is so much you can do with focaccia, you can prepare it for a basic pizza or you can get crazy and top it with goat cheese, olives and sun dried tomatoes. In this case, I am making it a classic tomato sauce-mozzarella pie. Whatever way you decide to top it is up to you, just as long as you enjoy it!


Focaccia

1 and ¾ cups of warm water
1 package active dry yeast
1 tablespoon sugar
5 cups of whole wheat flour
½ teaspoon dried Italian herbs
1 tablespoon kosher salt
1 cup extra-virgin olive oil, split

Mix warm water, yeast and sugar in a small bowl. Put the bowl someplace warm, not to hot of cold, just right, until the yeast is bubbling, probably around 15 minutes.
In a bowl with a dough hook, mix flour, herbs, salt, ½ cup olive oil and the yeast mix on low speed. Once it has all mixed, knead for about 5 minutes on a medium speed until smooth.Put the dough on a clean, lightly floured surface, then knead by hand 2 times. Cover with plastic and put in a warm spot until it has doubled in size, this should take around an hour.

Coat a jelly roll pan with the remaining ½ cup olive oil. Put dough on the jelly pan and press to fit the size of your pan. Turn the dough over to coat with olive oil. Continue stretching to fit the pan.

Put the dough in a warm spot until it has doubled in size, another hour. Preheat over to 425 degrees. Sprinkle the top of the focaccia with sea salt and drizzle a little olive oil on top. Bake for 5 minutes before adding pizza toppings.

There are many recipes for focaccia, feel free to use your favorite for the pizza!!

Tomato sauce

15 ounce can of crushed tomatoes
¼ cup olive oil
6 cloves of garlic (or as much as you like)
Salt
Pepper
Basil (finely chopped)
Crushed Italian herbs

Coarsely chop your garlic, cook in the olive oil until soft. Add tomatoes, olive oil, garlic, salt, pepper, basil and crush Italian herbs. Cook 6-7 minutes, until garlic is soft. It will continue to cook slightly when it is on the pizza in the oven.

Il secondo (second course, main course)

Every culture has its form of a meatball, so it is impossible to know exactly where they originated. However, the ancient Roman cookbook, Apicius (compiled in the late 4th or early 5th Century AD) featured many meatball type recipes.
In Italy, meatballs are known as polpette and are mostly eaten as a main course.

Meatballs in Marsala mushroom sauce

½ pound of ground sirloin
½ pound ground round
½ cup bread crumbs
¼ cup half and half
1 egg
Garlic powder (You can use fresh, just chop very finely, same for the onion)
Onion powder
Finely chopped Italian parsley
½ teaspoon dried Italian herbs, crushed
Salt
Pepper
Crushed Red Pepper (to taste)

Marsala Sauce

Crushed garlic
Thinly slice mushrooms (any kind)
Salt
Pepper
Thyme
½ cup Marsala wine
½ water or stock

Put your bread crumbs in bowl, cover with half and half, let soak until the bread crumbs are fully absorbed. Add your meat and the rest of your ingredients. Mix gently (too much handling makes for a tough meatball.) Shape into approximately 2 inch balls (Some people like their meatballs slightly flattened, whatever your prefer) Brown slowly, at least 8-9 minutes per side.  

For the sauce- Add your mushrooms and garlic to the same pan with meatballs. Allow the mushrooms to cook for about ten minutes. Add salt, pepper and thyme. Add the Marsala and your cooking liquid. Cover and let cook for an additional 10-
15 minutes.

For this meal, I’m going to suggest some Sinatra and Chianti. Buon Appetito!  

Wednesday, March 14, 2012

Burgers and Chips with dip: An American classic with an Italian twist

Now that the weather in New York is getting so beautiful, I started to think of summer. A relaxing walk on the beach, a cool swim in the pool and all of those tempting barbeques. When I think of summer, what comes to mind is a big juicy, mouthwatering burger slathered with flavored mayonnaise and a side of chips. But, while I want to keep most of my posts traditional, I also want to mix it up a little and have some fun. So when I was thinking about said burger and chips, I wanted to give them an Italian twist on it. And so ladies and gentlemen, without further ado, I present: Italian sausage burgers with zucchini chips and pesto aioli.   

Il secondo (second course, main course)

My mother first made these burgers for my family this past summer. They are so simple to make, but I promise you, they will be most impressive at your next barbeque. When my mama made these, my brother and father were raving about them for days. It took me a few times to finally try them, but when I did….wow. That’s all I can say. They are juicy and perfectly seasoned. But you know what, enough talk about them. I’ll let you be the judge.
Italian Sausage Burgers


1 pound of ground Italian sausage (hot or sweet, whatever you prefer)
Salt
Pepper
Chopped Italian parsley
Italian seasoning
Garlic powder
Onion powder
4 tablespoons grated parmigiana

Put your ground Italian sausage in a large bowl. Add your salt, pepper, parsley, Italian seasoning, garlic powder, onion powder and 4 tablespoons of grated parmesan. All of these spices are to taste, you can add as little or as much as you would like depending on how intense you like the flavor. Mix all of your meat and seasonings. Using your hands, form into 4 patties.
Prepare a pan with 3 tablespoons of oil and put your patties on the pan. Make sure each side cooks for around twelve minutes; you need to make sure that they are thoroughly cooked.  All together, it will probably take around 25 minutes for them to finish cooking. (These must be cooked slowly or the pork could get tough) Serve with a dollop of pesto aioli (recipe below.) I like to eat mine on a thin, whole grain bun, but may I also suggest serving them on ciabatta or focaccia? I also like to add a few pieces of arugula in place of lettuce, just another little twist.

Pesto Aioli:

4 tablespoons of mayonnaise
3 tablespoons of pesto (prepared pesto is easily found in Italian food shops)

Simply mix the mayonnaise and pesto until smooth and creamy.

Il Contorno (side dishes)
What’s great about zucchini is that you can slice it very thin; so it really gives that feeling and taste of potato chips. When they are lightly coated in a chickpea flour mix, they fry up nice and crunchy. I like to dip mine in the pesto mayonnaise instead of the usual onion dip.
Zucchini Chips

2 zucchinis
¼ cup of chickpea flour
Salt
Pepper
Finely chopped Italian parsley
3 tablespoons of grated parmigiana
1 egg mixed with 2 tablespoons of water
4 tablespoons of oil (for frying)

Thinly slice your zucchini. Put it in on a paper towel and salt it so it removes most of the water, let it sit for a few minutes.

Combine your chickpea flour, salt, pepper, parsley and grated parmesan in a flat, shallow bowl. This will make it easier to fully coat with the flour mixture.

In another bowl, whisk your egg and add 2 tablespoons of water.

Take the zucchini slices and dip in the egg mixture, make sure they get wet enough so everything sticks. Then put it with the flour mix and coat evenly.

Heat your pan and add 4 tablespoons of oil. Put the zucchini chips in the pan and allow to fry for around 5 minutes on each side. Gently use tongs to remove them from the oil and put on a paper towel so the excess oil can drain off. Salt again. Enjoy with your burger and some pesto aioli for dipping!!

While these are great to serve at a summer barbeque, why wait?!?! So go cook up your burgers and chips and eat outside if you can and have a taste of summer early. Boun Appetito!

Saturday, March 10, 2012

Chocolate espresso mascarpone cheesecake with amaretti crust, guest post with buttercarb.com


Today, I am very happy to be featured as a guest blogger on the wonderful and hilarious site, buttercarb.com. For Mean Girls fans, you should get the reference to Regina Georges famous line, “Is butter a carb?” Liam, who runs buttercarb.com, LOVES to bake, as made clear by all of his mouthwatering recipes. His site is a virtual feast for the eyes. His treats look amazing, but I must admit, when I saw his post for Nutella Thumbprint cookies, he sold me. When someone makes anything with Nutella, they’ve got my attention. So please, take a look at his site. I dare you not to laugh…and be tempted by his delicious sweets!! Enjoy!


I love that part of dinner when you’ve just finished up, you’re sitting and relaxing, letting your food digest….and waiting “patiently” for dessert. You don’t want to appear overeager; you just really want that slice of cake.  So for tonight we will be serving a lovely chocolate espresso mascarpone cheesecake with an amaretti crust. It’s creamy and sweet, while the chocolate and espresso add a nice density and round out the flavor.

What I love about my recipe is that it is very easy to make and it doesn’t take a long time to prepare. I make mine in a 5 inch tart pan as a single serve, but it can easily be doubled or tripled to make a larger dessert for a crowd….or if you’re really hungry.

With cheesecake, there are countless ways to make a crust to frame your cake. You have the traditional graham cracker crust, the chocolate wafer crust, a shortbread crust. But when I make a good old fashioned Italian cheesecake, I can think of no better way to “Italian” it up, then by adding the classic amaretti cookie which literally translates to “bitter little things”.

In the early 18th century, a Milanese bishop made an unexpected visit to the town of Saronno. A young couple who lived there welcomed him with an original creation; they made wafers of sugar, egg whites and crushed apricot kernels or almonds. The bishop clearly enjoyed the cookies and blessed the couple with a happy and lifelong marriage.

So how should we commemorate the unique history of this classic Italian cookie? Why, by making it into a yummy buttery crust and filling it with creamy, sweet, mascarpone cheese of course?!?

Chocolate espresso mascarpone cheesecake with amaretti crust:
Crust:

2 tablespoons of softened butter
15 amaretti cookies

Filling:

5 tablespoons mascarpone cheese
2 ounces of chocolate
1 tsp. vanilla extract
1 tbsp. instant espresso dissolved in 2 tablespoons of water
1 tbsp. of sugar

For the crust, you will want to grind the amaretti cookies in a food processor and add 2 tablespoons of softened butter. Shape the dough in a 5 inch tart pan. Bake in the oven for seven minutes. Take out to cool.

For the filling, melt 2 ounces of chocolate in a heat proof bowl. Heat 2 tablespoons of water in a cup and add the 1 tablespoon of instant espresso. Mix the chocolate, espresso, 1 tbsp. of vanilla extract and 1 tablespoon of sugar. Gently pour the chocolate mascarpone filling into the crust and make sure the top is nice and smooth. Put in your refrigerator to set for around one hour. Take out and enjoy!!

Thursday, March 8, 2012

Tiramisu from Bakingperfection.com

Ciao everyone! I am very excited to share with you a wonderful recipe for tiramisu from fellow blogger DJ at Bakingperfection.com. Bakingperfection.com is a great, very informative and helpful blog dedicated to baking and all the preparation that it takes. It walks you through some different methods to help make you into the best baker that you can be! One look at his cakes and you'll be sold. 

Tiramisu is made of ladyfingers dipped in coffee, layered with a mixture of egg yolks and mascarpone cheese, flavored with cocoa and liquor. There is some debate regarding the origin of Tiramisu. It may have started as a variation of another layered dessert, called Zuppa Inglese .

Several sources say that tiramisu was created at the restaurant Le Beccherie by the god-daughter and apprentice of confectioner Roberto Linguanotto, Francesca Valori, whose maiden name was Tiramisu. It is thought that Linguanotto named the dish in honor of Francesca.

Others believe the cake to have originated in the city of Sienna. Some bakers were said to have made it in honour of Cosimo III (the Medici Grand Duke of Tuscany) on the occasion of his visit to the city.

The translation of tiramisù is “pick-me-up", thought to refer to the caffeine in the espresso and effect of cocoa used in the recipe. Whatever it means, this recipe from DJ sure is delicious and decedent.  Please visit his fantastic blog at http://www.bakingperfection.com/ and enjoy his tempting recipes!! Here is the original post straight from his blog!


So who doesn’t love a good tiramisu? If you said “I don’t love tiramisu” well you’re a crazy crazy person and I don’t like you…okay I won’t go that far but you are a bit strange. I’ve seen tons and tons of recipes but I always find something I don’t like about them. I finally decided to pick out the things I do like and put them together to make one really solid recipe. I think I have succeeded with this recipe but you may not like what I do so you be the judge.


What you’ll need:
5 egg yolks

¾ cup-sugar (fine bakers sugar works best)
8 ounces mascarpone cheese (1 tub)
1 cup heavy whipping cream
2 packs of ladyfingers
1 cup-strong coffee or espresso (I use Medaglia D’Oro instant espresso)
¾ cup-Kahlua
Cocoa powder for dusting (optional)
White chocolate for shaving (optional)

Instructions:


Combine egg yolks and sugar in the top of a double boiler, over boiling water. Reduce heat to low and cook for about 10 minutes, stirring constantly. After 10 minutes, remove from heat and whisk until thick and bright yellow.

Add the mascarpone to the yolks and mix until combined and smooth. In a separate bowl, whip the cream until stiff peaks form. Gently fold the yolk mixture into the whipped cream.

Combine coffee and Kahlua in a pie pan or other shallow bowl. Dip the lady fingers in for about 5 seconds and then place them in a single layer in a 8 X 8 glass pan. Top the lady finger layer with the custard cream mixture. Make another layer of lady fingers and again top with custard cream mixture. Smooth the top and sift the cocoa powder over it. Use a fine grater and grate white chocolate over the cocoa. Refrigerate for at least 3 hours but overnight is better.

Tips:
I did not have my 8 X 8 pan so I just used a random one I found, you can do the same.

Mascarpone is kinda expensive, but if you have a Trader Joe's nearby (depending on where you live) they make their own mascarpone that is a lot cheaper and just as good. If you can't get the mascarpone cheese you can just combine the following for a substitution:

8 ounces cream cheese
2 tsp. sour cream
2 tsp, heavy cream

Tuesday, March 6, 2012

For dinner tonight: Rosemary lemon roasted chicken with potatoes and zucchini and chickpea fritters


Buongiorno! Tonight for dinner we will be serving: Rosemary lemon roasted chicken with potatoes and zucchini with a lovely side of chickpea fritters.  Hungry yet?

Il Secondo (second course, main course)

For me, a classic Italian comfort food would be rosemary lemon roasted chicken with potatoes and zucchini. It’s a classic “meat and potatoes” dish. Some people have steak and mashed potatoes, well; this is my steak and mashed potatoes. If the chicken is cooked just right, it will be moist and tender; you should be able to use a fork to get the chicken off the bone, no need for a knife. Your kitchen will be filled with the fresh fragrance of lemon and rosemary, a favorite combination of mine. Made with roasted potatoes and zucchini, this is my idea of a perfect meal to enjoy after a long, hard day. I wish I could prepare this dish with the beautiful lemons they had in Ischia, but until I get back over there, regular lemons will just have to do.

Rosemary lemon roasted chicken with potatoes and zucchini


1 whole chicken, cut up (or any pieces you like if you prefer)
½ cup salt
2-3 whole lemons
Whole head of garlic, peeled and the cloves slightly crushed
Crushed red pepper
Salt+Pepper
Fresh rosemary
Fresh thyme
2 zucchini
2 potatoes

First, rinse your chicken thoroughly and cover it with cold water and the half cup of salt. Stir to make sure the salt is dissolved and let the chicken soak for half an hour. Drain. Squeeze the juice of the lemons over the chicken, add the garlic, the crushed red pepper, salt +pepper, rosemary and thyme (the spices and herbs to taste, remember, quanto basta.) Let it marinate for up to half an hour. Place in a baking pan in a pre-heated 350 degree over, skin side down. Meanwhile, slice your zucchini into approximately half inch slices and your potato into 1-1½ inch cubes; you can keep the skin on.

After the chicken has cooked for about a half an hour, turn to skin side up, add the potatoes and zucchini and mix gently. Cook for another half hour to forty-five minutes and check that your chicken is thoroughly cooked. (You can turn the heat up to 400-450 degrees if you would like to brown the chicken and vegetables slightly.) Serve and spoon some of the sauce from the baking pan over the chicken.

Il contorno (Side dishes)

I love Italian fritters, sweet or savory. I’ll take it either way. The Sicilian specialty panelle are one of the most well recognized street foods of Palermo, often eaten on a toasted roll as a sandwich. They are made using chickpea flour, farinata di ceci, The panelle are traditionally round, flat fritters. The Sicilian proverb” pari na paniella”, you look similar to a panella, referred to an object that had the misfortune to be flattened by excessive weight. They are light and delicate, crunchy on the outside and slightly soft in the middle.

Chickpea fritters: Panelle


1 cup chickpea flour
2 cups water
1/2 bunch fresh parsley leaves, finely chopped, plus more garnishing
1 teaspoon salt
1 teaspoon pepper
3 tablespoons extra-virgin olive oil plus more for the pan
1 garlic clove, sliced
2 eggs
In a medium size saucepan, dissolve the chickpea flour in 2 cups of water. Stir in chopped parsley, salt, pepper, 3 tablespoons of extra-virgin olive oil, 1 sliced garlic clove and 2 eggs. Put the saucepan over medium heat and continue mixing until they form a thick paste. Remove the pan from the heat and let cool.
Fill a deep pot with extra-virgin olive oil. Heat oil over medium-high heat. Using your hands, shape the chickpea flour dough into flat little fritters. Fry the fritters until golden brown, around seven minutes each side. Remove the finished fritters to a serving plate. Let cool before serving.

Might I suggest a glass of prosecco and some Verdi playing in the backround? Boun Appetito!

Saturday, March 3, 2012

Boston's North End


My mother and I recently took a trip to Boston. We love the history, the shopping and oh yes….the food. Most major cities have their own Little Italy, but what I love about Boston’s is that to me, it has not turned into a huge stereotype. There aren’t a lot of shops selling “Italians do it better” shirts and there are no photos of The Godfather. Instead, there are family run restaurants and bakeries and stores selling imported goods from Italy like soaps and skincare. There are still Italians living here; you can see them on the streets speaking with each other in fluent Italian, asking about each other’s children and grandchildren. This is the North End.

The first Italians arrived in the North End in the 1860s; their numbers grew in the 1880s and 1890s. Many of the first Italian immigrants worked as vendors of fruits and vegetables, peddlers and shopkeepers, selling food, clothing, and services needed by other residents of the North End. Over time, people began living together on streets segregated by the region of Italy - Sicily, Milan, Naples, and Genoa. Over the next decades, the Italian population of the North End increased and other immigrant groups moved elsewhere. By 1900, Italians had firmly established themselves in the North End, and by 1930, it was almost one hundred percent Italian. While now Italians make up less than half the population, the feeling of Italia is always there as made clear by all of the wonderful places to enjoy a fantastic meal.

While there on our last trip, my mother and I were looking for a place to have a late lunch, unaware that most of the restaurants close early and open again later for dinner. Lucky for us, we stumbled upon a lovely, old school Italian restaurant called Cantina Italiana. Cantina Italiana opened its doors in 1931 and is the oldest restaurant in the North End. Inside it is dimly lit and the ceilings are low, giving the restaurant a cozy feel. It’s set up very comfortably; high dark wood panels separate each booth, giving the patrons a sense of privacy and the seats have classic plush forest green cushions and there are plenty of tables for a romantic dinner. Our waiter recommended we try one of their specialties’; the Bombolotti alla Buongusaia. It is described as “Homemade Bombolotti pasta, tossed with spicy Italian sausage, fresh basil and marinara sauce, topped with parmigiano and fresh goat cheese, baked to perfection.” Many people have no idea what bombolotti is, mostly because you don’t find it on menus very often. It’s a long, tubular pasta with spokes in the middle, it is shaped like a wagon wheel and it has to be cooked perfectly al dente, otherwise you won’t appreciate the center of the pasta. The dish came out fresh from the oven in a large white ramekin, the cheese bubbling, steam escaping from the plate. It looked too perfect to eat, the pasta was layed out to showcase the unique size and shape, decorated with spicy Italian sausage and finished with a sprinkle of fresh basil and freshly grated parmigiano.  It was a site and a taste to behold.

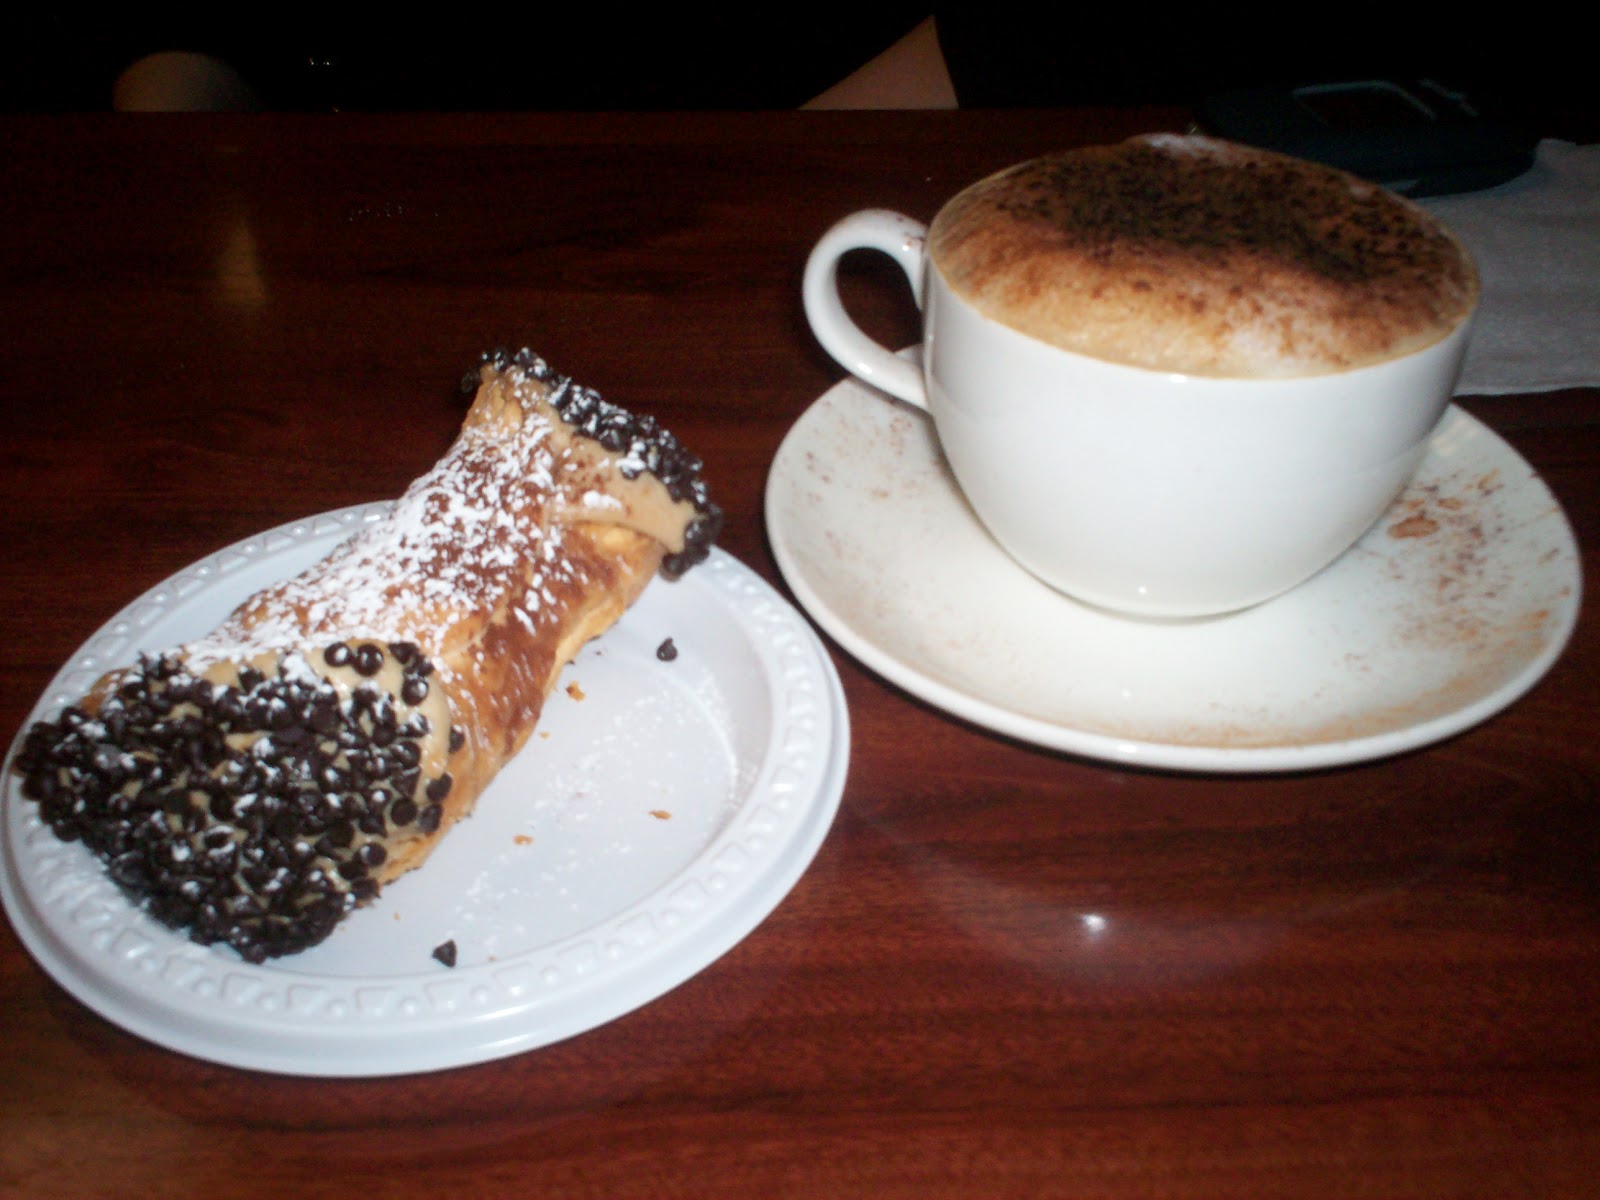
Now, when I finish a big beautiful meal, I need something sweet to cap it off. So what better place to go than Mike’s Pastry? Mike’s Pastry is a wonderful family run bakery and has been for over fifty years. Be prepared to be overwhelmed by the assortment of sweet treats and expect a big line. Cannolis are what they are famous for. Most of the time Mike’s is packed and when you try the cannolis, you’ll understand why. For one thing, they have so many variations. Pecan and Caramel, hazelnut, pistachio, espresso, oreo, ricotta, chocolate dipped. You name it, they have it. When we went, we were lucky enough to grab a table pretty quickly. We ordered an espresso canolli and a cappuccino. I know what you’re thinking, one cannoli for two people? But trust me, when you see the size of these things, you’ll get it.


Now, I’m going to let you in on a deep dark secret. I was never a fan of cannolis. I love sweets but I just didn’t like them. They didn’t do it for me. But when I tried these for the first time at Mike’s last year, I had a cannoli epiphany. It was literally an “angels singing” moment.

Most cannolis traditionally have a ricotta filling, but the one I had was made with mascarpone (although they do offer ones with ricotta.) The filling was light, smooth and creamy. It had a sweet, subtle taste of espresso without being overpowering and the crunch of the chocolate chips added a nice contrast. The shell was crisp and crunchy, light as air, with just a touch of sweetness and not at all oily. It was the perfect cannoli.

In addition to cannolis they offer other classic Italian pastries like lobster tails, rum cakes, pasticiottos, taralli and they also offer a wide selection of cookies, cupcakes and brownies. I’d love to try something else, but every time I go, that cannoli is calling my name.
If you have been to Cantina Italiana, Mike’s Pastry or any restaurant in the North End, please comment and let me know what you thought of your experience and more important, what you ate!! Ciao for now!